
Ⅰ. Overview
Following the previous post, we install a DB server and connect it to the WAS server. We use the Hping3 tool to perform a simple exercise related to DDos attacks. We use the John tool to practice the attack technique of guessing account passwords. We also briefly learn about Injection attacks as an example of SQL Injection.
Ⅱ. DB
The DB server MariaDBWe will use it. Before installing the DB server, you can connect to it. Download the connector to the Tomcat (WAS) server and change the environment variables. The environment variables are set for both JAVA and Tomcat. This is to allow libraries such as Connector to be utilized by Tomcat and JAVA.
※ The environment variable is from Linux (Ubuntu) /etc/profileRegister it. And set Environment variable setting information can be queried through commands.
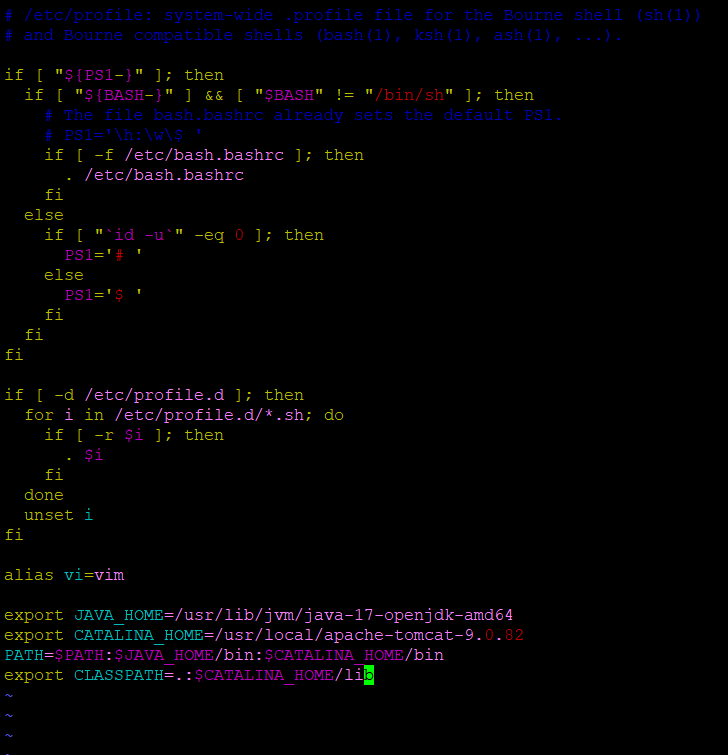
You can modify the /etc/profile file as follows. export means setting environment variables, and it adds the JAVA and Tomcat-related parts to the existing PATH path (the bin directory is the directory related to execution). Finally, we specify the Tomcat lib directory in the CLASSPATH because the Connector is downloaded to this path. MariaDB ConnectorDownload it.
MySQL :: Download MySQL Connector/J (Archived Versions)
It's called the MariaDB Connector, but why is it called a MySQL page? It's basically the same database. I recommend you do some research.
※ source /etc/profile When you enter the command, it immediately applies the modified configuration file.
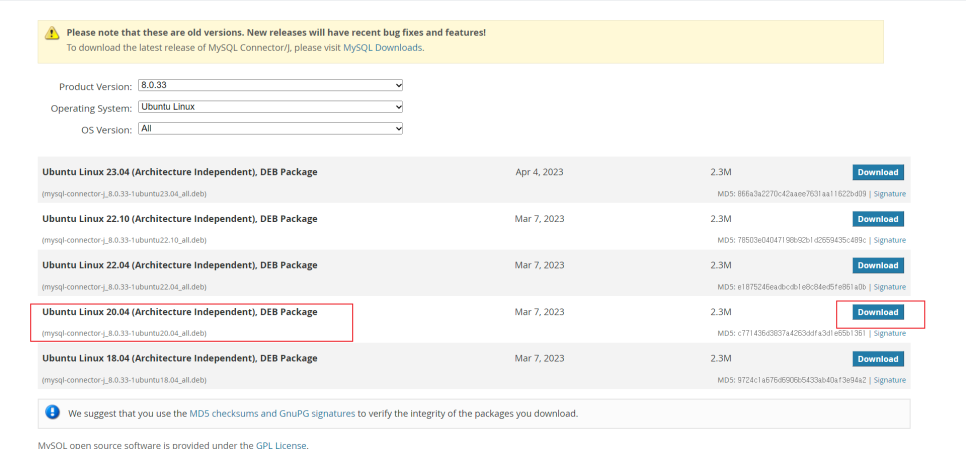
Here, copy the link and download it to any directory with 'wget'. 'sudo apt install binutils' Install the package, and then 'ar -x mysql-connector-j_8.0.33-1ubuntu20.04_all.deb' If you extract the file and also extract the compression of the 'tar xvzf data.tar.xz' file, the usr folder will appear as shown in the image below.
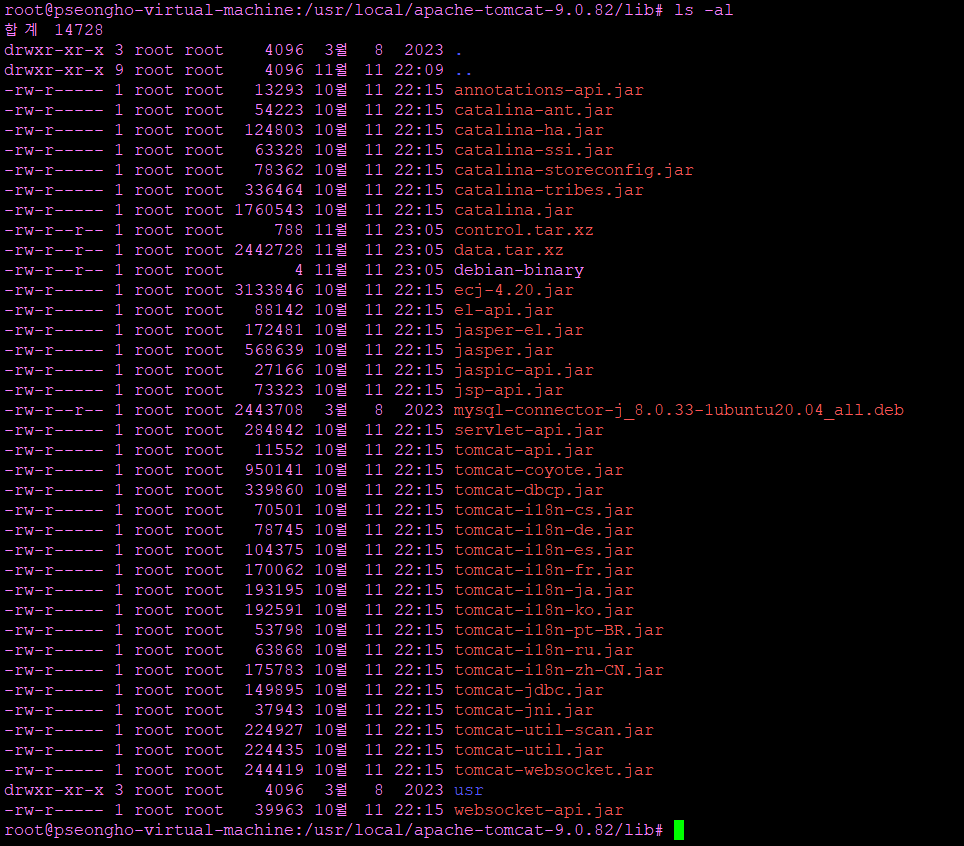
/usr/local/apache-tomcat-9.0.82/lib/usr/share/java/ mysql-connector-j-8.0.33.jar In this path, mysql-connector-j-8.0.33.jar Move the file to the /usr/local/apache-tomcat-9.0.82/lib directory, and remove all other files and directories, including debian, control, data, deb, and usr. Leave the following as it is:
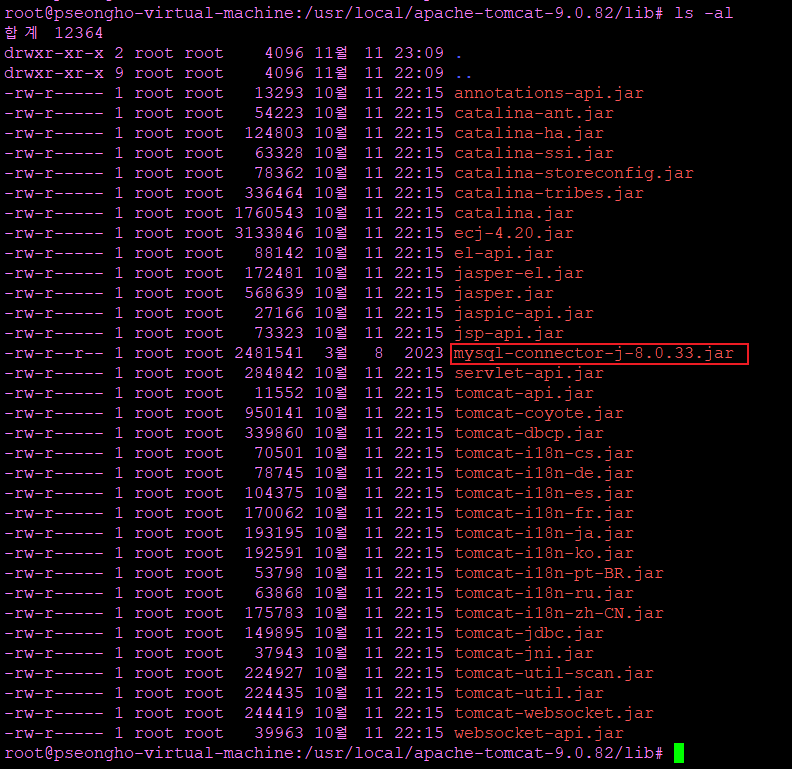
Use the source command to apply the configuration and restart the Tomcat server. Then, connect to another virtual machine program to install the DB server. 'sudo apt install mariadb-server'You can also install it by running 'sudo systemctl enable mariadb' to add it to the bootup script for the virtual machine.
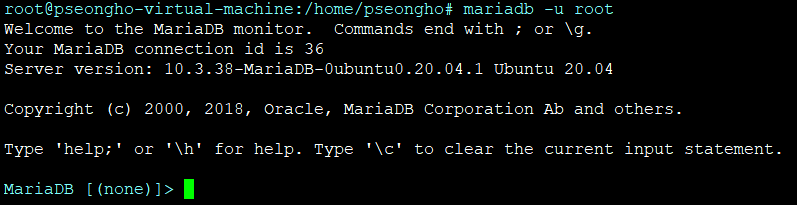
After installation, you can log into the MariaDB shell as the root account with administrator privileges and perform various database operations.
create database test; #스키마 생성
create user 'test'@'%' identified by '1234'; #새로운 계정 생성
grant all privileges on *.* to test@'%'; #스키마에 대한 계정 권한 부여
flush privileges; #권한 변경 즉시 적용
Although it is left as a comment, the database requires study. We strongly recommend that you study the related commands and their operation separately. Since the content is extensive, we will simply replace it with a comment explanation here.
create table member(
    id int,
    name varchar(15),
    password varchar(20)
);

insert into member(id, name, password)
values
(1, '일', 'abcd'),
(2, '이', 'bcde'),
(3, '삼', 'cdef'),
(4, '사', 'defg'),
(5, '오', 'efgh');
And let's just assume we have this data.
Now, to verify that data is flowing normally, open the Tomcat (WAS) server. /usr/local/apache-tomcat-9.0.82/webapps Rename the existing ROOT directory in this path to something like ROOT.ori, create a new ROOT directory with mkdir, and then enter the ROOT directory to create the index.jsp file.
<%@ page language="java" contentType="text/html; charset=UTF-8" pageEncoding="UTF-8" import="java.sql.*" %>
<!DOCTYPE html>
<%
String DB_URL = "jdbc:mysql://10.10.10.10:3306/test";
String DB_USER = "test";
String DB_PASSWORD = "1234";
String sql = "";
Connection conn = null;
PreparedStatement ptmt = null;
ResultSet rs = null;

try {
        Class.forName("com.mysql.jdbc.Driver");
        conn = DriverManager.getConnection(DB_URL, DB_USER, DB_PASSWORD);
        sql = "select * from member where id = 1";
        ptmt = conn.prepareStatement(sql);
        rs = ptmt.executeQuery();
        if (rs.next()){
                out.println("Success "+rs.getString("name")+" "+rs.getString("password"));
        }else {
                out.println("실패");
        }
}catch(Exception e){
        out.println(e);
}finally{
        conn.close();
        ptmt.close();
        rs.close();
}
%>Since it is important to check whether the connection is established, we will write it down like this. Finally, the DB server only allows local access with 127.0.0.1, so we will go to the file at this path: /etc/mysql/mariadb.conf.d/50-server.cnf bind-address changes the part to all IP allowed 0.0.0.0.
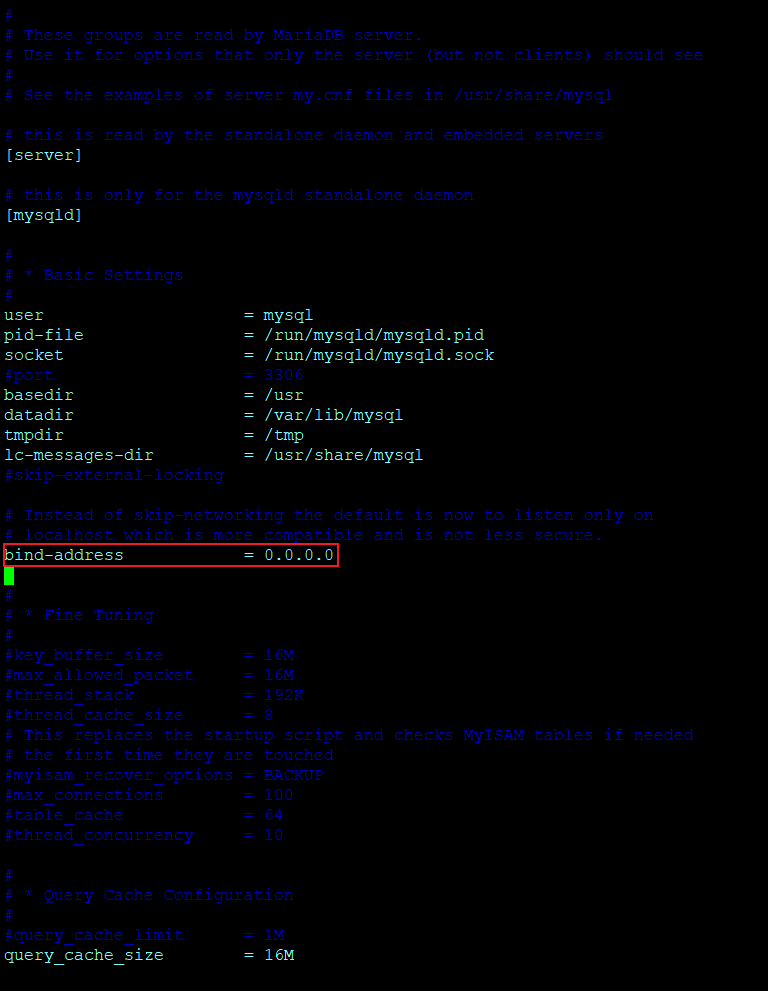
And if you restart the DB server with sudo systemctl restart mysqld,

You can see the changes. Now, for the last time, if you go to the WEB server address with all the servers running,


Not only is the connection to the WAS server successful, but we can also retrieve data from the DB server!
Ⅲ. Hping3
Sending large packets with the purpose of taking down the server DDos attackI'd like to try it out briefly. First, 'sudo apt install hping3'Install it. Once installed, 'sudo hping3 --icmp 10.10.10.7 (WEB server address built on 3Tier) --rand-source --flood'Let's execute the command.

Then, we would be sending packets, but in this case, the packets are not recorded in any special access log. tcpdump To create a file of packet details, you need to use the command 'tcpdump -w test.pcap' on the WEB server. This will save the packet log to a file.

If you enter the command like that, it is still in progress, so you need to terminate the creation separately. WinSCP send the test.pcap file to your operating system through the program Wireshark When you open the program,
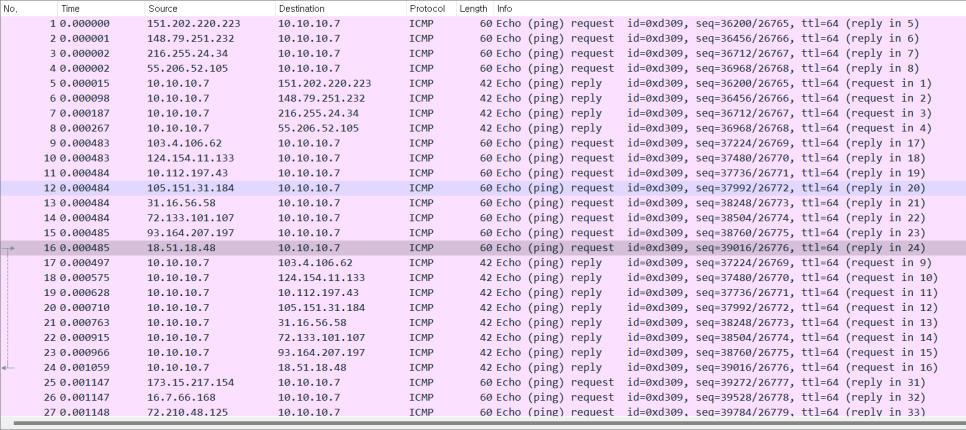
You will see countless ping attack logs. Think of this as a literally useless DDos trial.
※ tcpdump port port number: The tcpdump command also has an option to store only packets coming into a specific port.
IV. John
Named after the British serial killer Jack the Ripper John the RipperThere is a cracking tool called Cracker. It was developed to crack passwords on Unix operating systems, and simple passwords can be found easily. Multiple cryptographic algorithmsIt includes. This list of passwords for the crack exists separately, and
john --wordlist=경로 및 파일명This command can be used. There are already many websites out there List of vulnerable passwordsYou can download it and run the john crack using this file. To experience it in full, 'sudo apt install john'Install it. To test it, 'sudo adduser test1 (account name)' Use the command to create a new Linux account (with a simple password of 'piglet'). Check the /etc/passwd file to make sure the new account was created correctly.

Create a directory called john in any directory. Since the existing passwd file has been replaced with a hash password, it is necessary to unshadow the /etc/shadow file, which stores the hash password, and replace the x portion of the passwd file with the hash password, creating a new file and saving it. 'sudo unshadow /etc/passwd /etc/shadow > ./passwd'Run the command to save the converted Linux account password file. When you open the passwd file that was saved, you will see:

You can see the file saved in this modified state. Now, to actually run the crack (which randomly guesses the password of the account) and find the password, 'find john password file'We can just run it. Since it can take a long time to actually find the password, we'll only look for it on the test1 account we created. 'john --user=test1 ./passwd' When you enter a command, it proceeds (automatically) and notifies you of the results it finds.
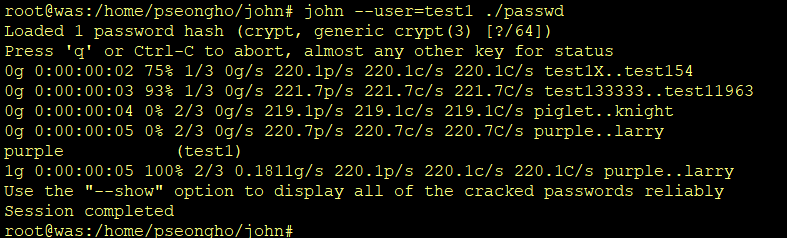
※ /etc/sudoers There is a file, and editing it may grant root (administrator) privileges to the regular account. Since it is dangerous to modify this file, a warning message will appear, but you can ignore it.
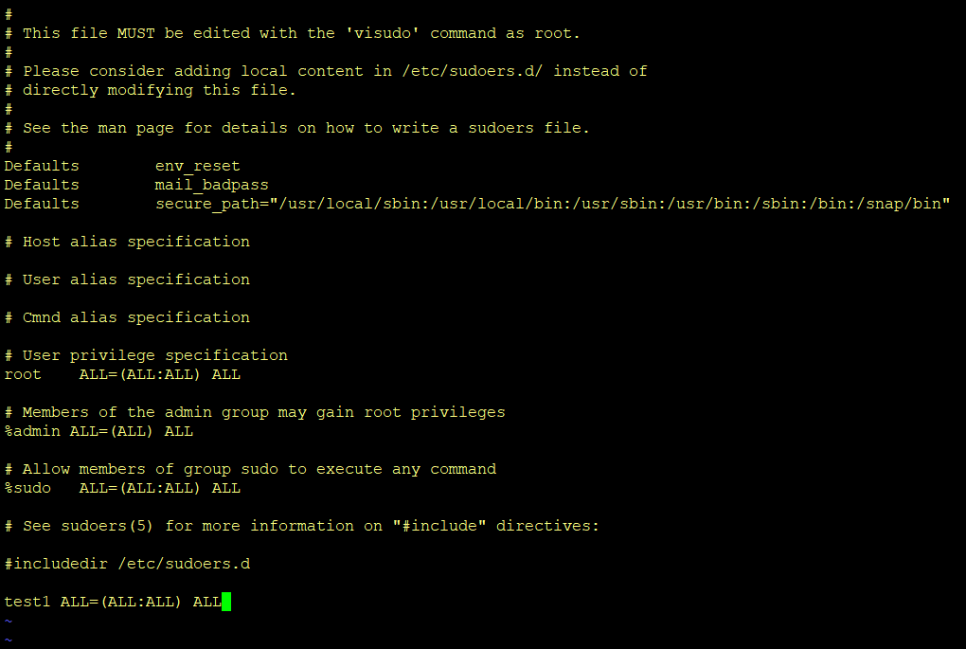
After making these changes and saving them, you can log in again and use administrator privileges. /etc/ssh/sshd_config There is a file, and when accessed via the SSH protocol, it is for the root account. Configuring to restrict or allow login on the SSH serverYou can either allow or prevent login with root privileges. When you open a file, it appears as follows:
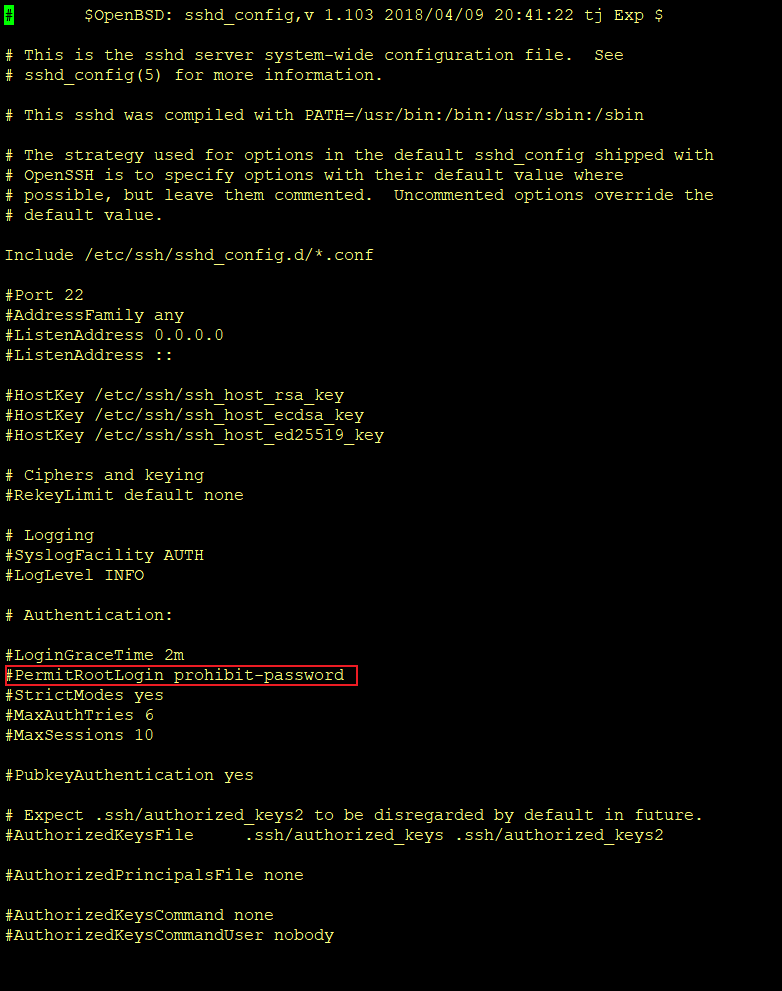
You can change the commented-out PermitRootLogin property.
※ Injection There is a concept called SQL injection, which is a technique for exploiting vulnerabilities in code. Simply put, if a website queries the member table in the database when a user logs in,
select * from member where id = '' and pw = ''Let's say we confirm this. In this case, the password
aaa' or 'x' = 'xIf you enter it, the SQL query is
select * from member where id = 'abc' and pw = 'aaa' or 'x' = 'x'It works. 'or'If either of these is true, the login will be compromised. This is a very basic SQL injection, and there are various injection attacks, such as changing permissions when modifying an account or inserting JavaScript code to prevent login.
Reviews
I think that the important parts related to this week's class have been almost finished. Actually, there is still the Docker part that we covered on the last day (Friday), but I think that I still need to study more and can cover it in the cloud class that is planned later, so I will try to post it when I have time. If I learn it later, I will post it all at once, or I will post it when I have studied enough separately. 🖐️